- All
- Product Name
- Product Keyword
- Product Model
- Product Summary
- Product Description
- Multi Field Search


You heat treat steel by heating it to a specific temperature, holding it there, then cooling it rapidly before tempering. This process changes the metal’s structure to improve strength and durability. About 80% of steel products in industry undergo this treatment. Always wear protective gear and use safe tools. Common hazards include heat stress, burns, sharp edges, and electrical risks, so stay alert and work carefully.
Heat treating steel involves heating, holding, and cooling to improve strength and durability.
Always wear protective gear like gloves and goggles to ensure safety during the heat treating process.
Choose the right tools, such as a propane torch or furnace, to achieve the correct temperature for your steel.
Clean your steel thoroughly before heat treating to ensure even heating and prevent weak spots.
Monitor the temperature closely during heating and quenching to avoid warping or cracking.
Select the appropriate quenching medium, like oil or water, based on the type of steel you are using.
Tempering after quenching is essential to reduce brittleness and enhance toughness in your steel.
Keep detailed records of your heat treating process to identify patterns and improve future results.
Before you start heat treating, you need the right tools and materials. Using proper equipment helps you get the best results and keeps you safe. Many professionals trust products from Shanghai Changzeng Metal Co., Ltd. because their steel meets high industry standards and works well for heat treating.
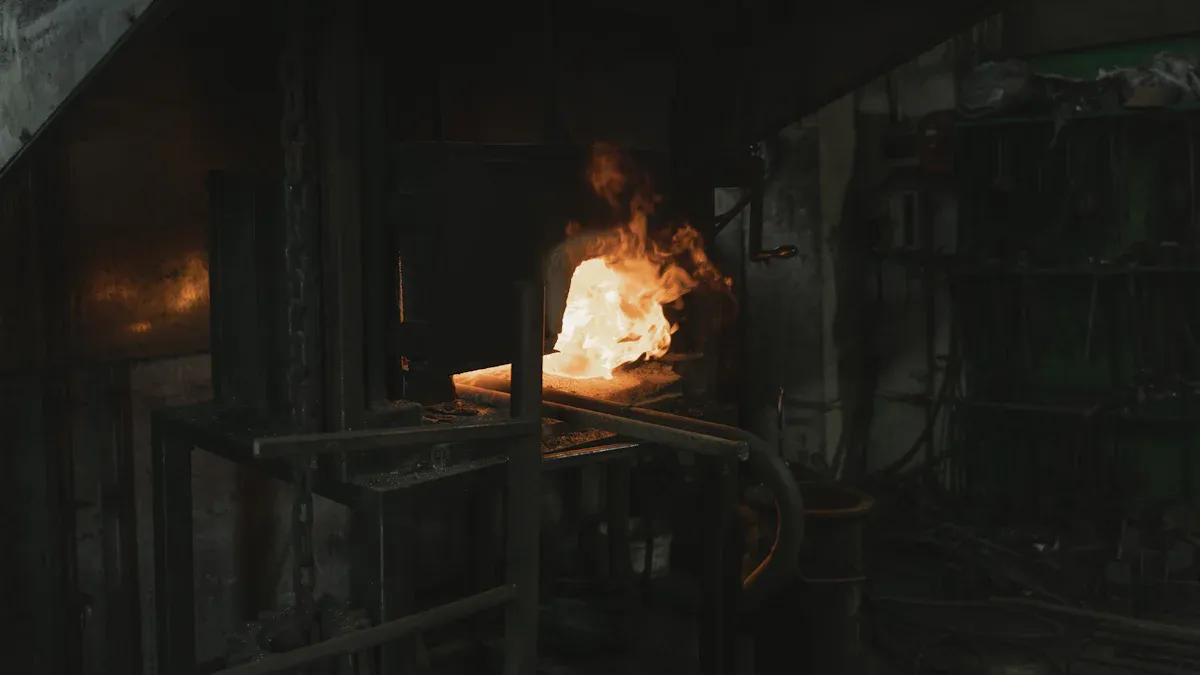
You need a reliable heat source to reach the correct temperature for your steel. Most beginners use a propane torch or a small forge. Some people use a gas or electric furnace for better temperature control. If you want to treat larger pieces, a kiln or industrial oven works best. Always choose a heat source that can reach at least 1,500°F (815°C).
After heating, you must cool the steel quickly. This step is called quenching. You can use different liquids or even air for this. Here are some common choices:
Oil: Most people use oil for quenching. It cools the steel at a moderate rate and reduces the risk of cracking.
Water: Water cools steel faster than oil. Use it only for certain types of steel, as it can cause warping or cracks.
Air: Some steel types need to cool slowly in air. This method works well for air-hardening steels.
Tip: Always use a metal container for your quenching media. Plastic can melt or catch fire.
Wear long sleeves, pants, and closed-toe shoes. Choose natural fibers like cotton or leather. Synthetic fabrics can melt and cause burns. Use heat-resistant gloves and safety goggles to protect your hands and eyes.
Keep a fire extinguisher nearby. Work in a well-ventilated area. Remove flammable items from your workspace. Always have a bucket of sand or water ready in case of emergencies.
Pick the right steel for your project. Shanghai Changzeng Metal Co., Ltd. offers many options, such as angle steel, H beams, and steel channels. Their products are known for durability and high performance. You can also request custom steel shapes or sizes through their OEM services. Always check the steel’s specifications to make sure it matches your heat treating needs.
Note: Using high-quality steel from a trusted manufacturer helps you achieve better results and ensures safety during the process.
Before you start the heat treating process, you need to prepare your steel carefully. Proper preparation helps you achieve the best results and prevents problems during heating and quenching. Clean surfaces allow heat to reach the metal evenly, which leads to consistent hardness and strength. If you skip this step, you may see uneven results or even damage your project.
A clean surface is essential for effective heat treatment. Dirt, oil, rust, and mill scale can block heat and cause weak spots. You have several ways to clean your steel before you begin:
Solvent Cleaning: Wipe the steel with acetone or another strong solvent. This removes oil, grease, and light corrosion.
Abrasive Grit Blasting: Use a shot-blasting machine to strip away tough dirt, mill scale, and rust. This method works well for large or heavily corroded pieces.
Hand & Power Tool Cleaning: Use wire brushes, sandpaper, or power tools to reach tight spots and remove stubborn debris.
Acid Pickling: Dip the steel in a mild acid bath to dissolve rust and mill scale. Rinse thoroughly after this step.
Flame Cleaning: Pass an oxy/gas flame over the surface to flake off rust scales. This method works quickly but requires caution.
Wet Abrasive Blast Cleaning: Combine water with abrasive blasting to reduce dust and clean the steel safely.
Tip: Always wear gloves and eye protection when cleaning steel. Some cleaning methods use chemicals or create dust that can harm your skin or lungs.
Rust can weaken steel and interfere with heat treatment. Remove all visible rust before you continue. For light rust, use a wire brush or sandpaper. For heavy rust, try abrasive blasting or acid pickling. Make sure the surface feels smooth and clean to the touch.
After cleaning, mark your steel so you can track your work and measure progress. Use a scribe or permanent marker to make clear, visible lines. Marking helps you identify where to cut, heat, or test the steel later.
Accurate measurements are important for every project. Use a ruler, caliper, or tape measure to check the length, width, and thickness of your steel. Write down your measurements in a notebook or on the steel itself. This record helps you stay organized and ensures you meet your project’s requirements.
Note: If you need special shapes or sizes, Shanghai Changzeng Metal Co., Ltd. offers product customization and OEM services. You can order steel that fits your exact needs, which saves time and improves your results.
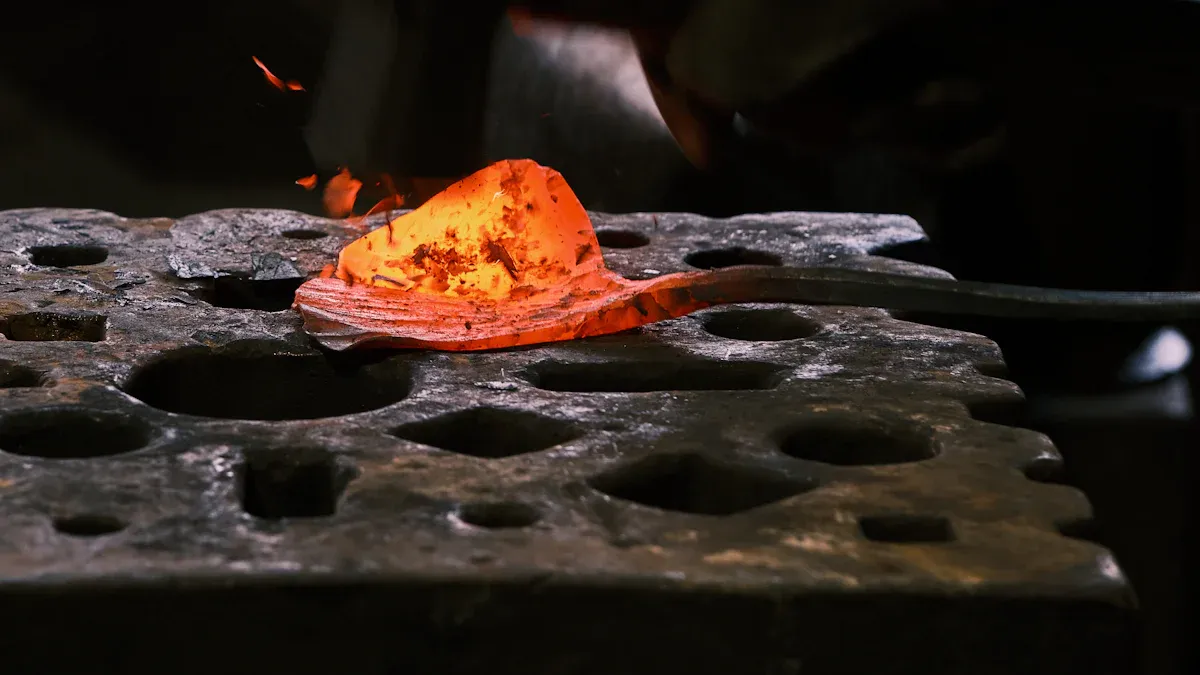
Heating is the most important step in the heat treating process. You need to raise the temperature of your steel in a controlled way. This changes the internal structure and prepares it for quenching and tempering. Good temperature control helps you avoid warping, cracking, or uneven hardness.
Preheating helps you prevent thermal shock and reduces the risk of cracks. It also ensures that the steel heats evenly, which is important for achieving the right mechanical properties.
You can use a two-step method for preheating. First, bring the steel up to a lower temperature to drive out moisture and reduce stress. Then, increase the temperature to the target range for heat treatment. This method works well for thicker pieces or high-carbon steels.
Preheat can prevent cracking and ensure specific mechanical properties such as notch toughness.
Preheat is necessary when codes specify it. If not, you must decide based on the steel's chemistry and thickness.
Low carbon steels less than 1 inch thick usually do not need preheating. Thicker or higher-alloy steels benefit from this step.
Tip: Always heat slowly and evenly. Rushing this step can cause internal stress and lead to failure during quenching.
Controlling the temperature is key to successful heat treating. You need to know how hot your steel is at every stage. Too much heat can ruin the structure, while too little heat will not give you the results you want.
You can judge the temperature of steel by watching the color changes as it heats up. The surface color shifts due to oxidation and the formation of oxide layers. Each color matches a specific temperature range. This method is useful if you do not have a thermometer.
| Stainless Steel Color | Temperature |
|---|---|
| Pale Yellow | 550ºF |
| Straw Yellow | 650ºF |
| Dark Yellow | 700ºF |
| Brown | 750ºF |
| Purple Brown | 800ºF |
| Dark Purple | 850ºF |
| Blue | 1000ºF |
| Dark Blue | 1100ºF |
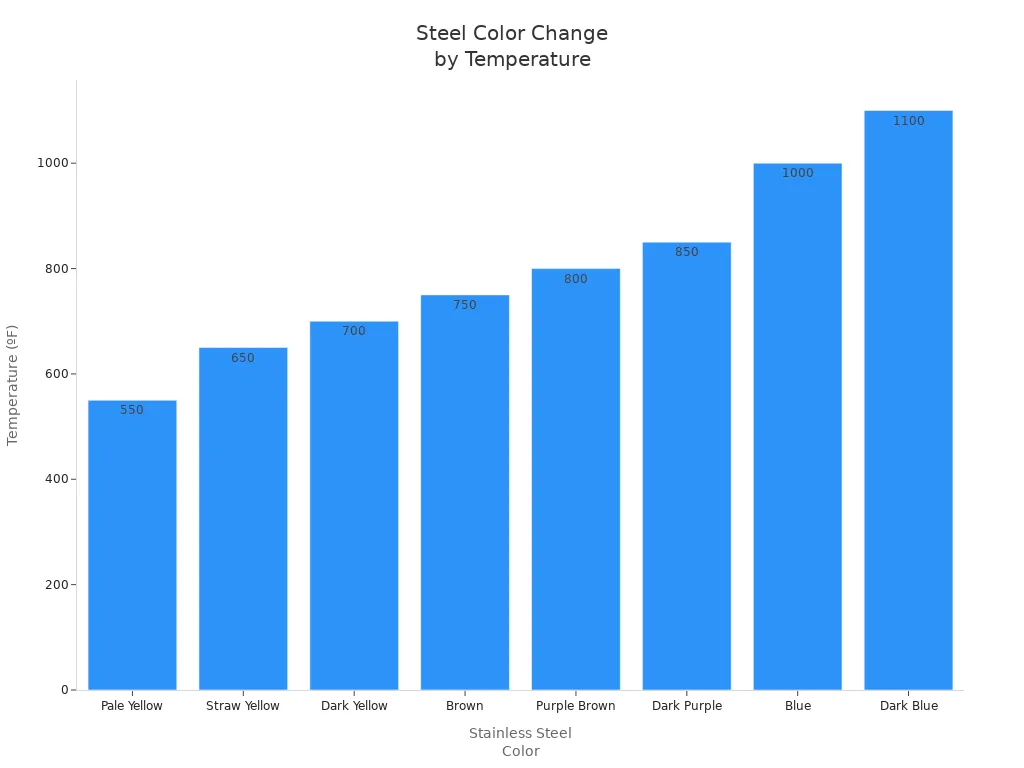
Note: The color method works best in low light. Clean the steel surface for accurate color reading.
For more accuracy, use a thermometer designed for high temperatures. Several types work well for heat treating:
The Process Sensors Metis M3 Series pyrometers measure temperatures from 50°C to 3300°C. They offer adjustable focus and come in one-color or two-color versions.
The PSC-40 Series is a loop-powered IR sensor. It covers a range from -40 to 2500°C and offers variable or fixed focus optics.
KEYENCE's FT Series uses non-contact infrared technology. It detects temperature by measuring blackbody radiation.
These tools help you avoid guesswork and achieve consistent results.
Tip: Always double-check your thermometer’s calibration before starting.
You can use either a torch or an oven to heat steel at home. Each method has its own strengths and weaknesses.
| Advantage/Disadvantage | Induction Heating | Torch Heating |
|---|---|---|
| Repeatability | Superior | Inconsistent |
| Heating Speed | Faster | Slower |
| Process Safety | No open flame | Open flame |
Torch Heating: A propane torch is easy to use and affordable. It works well for small pieces. You need to move the flame evenly to avoid hot spots. The open flame means you must stay alert for fire hazards.
Oven Heating: An electric or gas oven gives you better temperature control. You can heat larger pieces more evenly. Ovens are safer because they do not have an open flame. However, they may take longer to reach the desired temperature.
Tip: For best results, use an oven for even heating and a torch for quick adjustments or small projects.
Always monitor the temperature closely. Use the color chart or a thermometer to check your progress. Good temperature control leads to strong, reliable steel parts.
Heating your steel is only the beginning. You must also soak it at the right temperature to get the best results. Soaking means holding the steel at a specific temperature for a set amount of time. This step lets the heat spread evenly through the metal, which helps you achieve uniform hardness and strength.
You need to soak your steel long enough for the heat to reach the center. The right hold time depends on the size and thickness of your piece. If you rush this step, you may end up with soft spots or uneven hardness. For alloy steel, experts recommend the following soaking times:
Soak thin pieces for about 30 minutes.
Soak thicker pieces for up to 1 hour.
Always adjust the time based on the steel’s size and thickness.
Tip: Set a timer to help you keep track of soaking time. Consistency leads to better results.
You must avoid overheating during soaking. If you let the steel get too hot, you can damage its structure and performance. Overheating causes several problems that can ruin your project. The table below shows what can happen if you make this mistake:
| Consequence | Implication |
|---|---|
| Excessive grain growth | Reduces toughness and fatigue resistance |
| Non-uniform mechanical properties | Potential failure of the steel |
| Increased energy consumption | Higher costs and risks of decarburization/oxidation |
Alert: Watch your temperature closely. Use a thermometer or check the color of the steel to avoid overheating.
Soaking temperature plays a big role in shaping the microstructure of steel. If you heat the metal quickly, you can create smaller grains and more martensite, which makes the steel stronger. When you soak medium manganese steel between 670°C and 870°C, you change its internal structure. At around 720°C, you form a duplex microstructure with ferrite and retained austenite. This combination improves both strength and ductility.
You need to balance soaking time and temperature. If you soak too long or at too high a temperature, you risk damaging the steel. If you soak too little, you may not reach the desired hardness. Careful control during soaking helps you create steel parts that are tough, reliable, and ready for the next step.
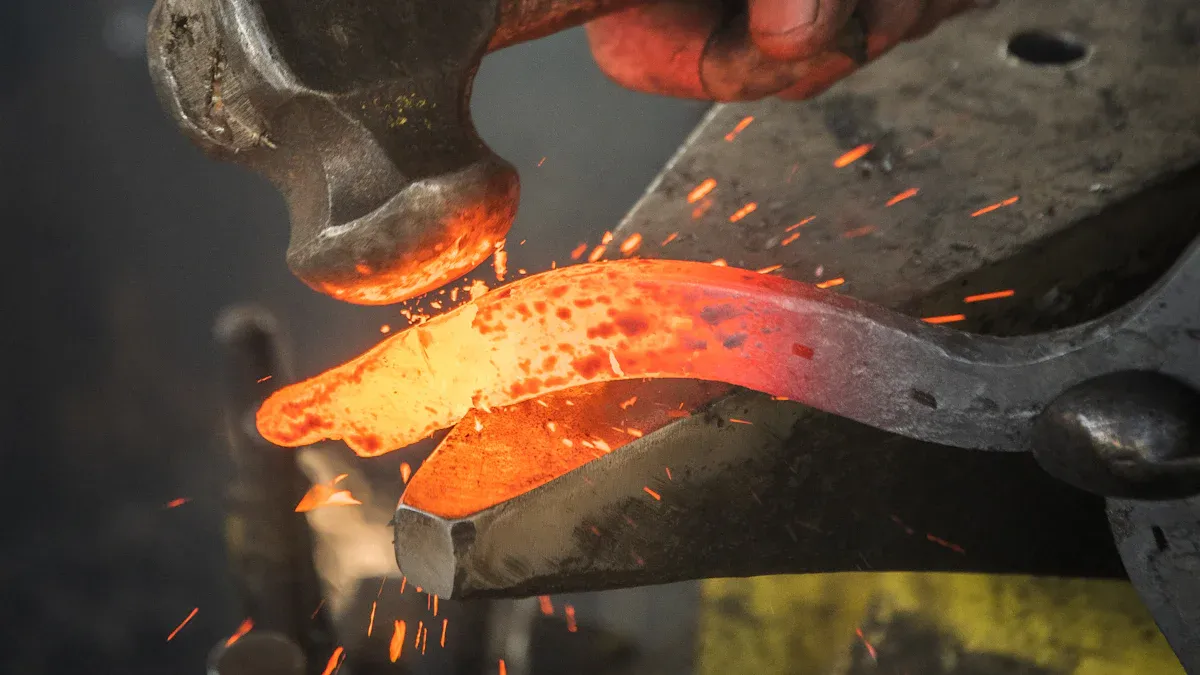
Quenching is a critical step in heat treating. You rapidly cool hot steel to lock in hardness and create the desired mechanical properties. The choice of quenching media and technique directly affects the final performance, durability, and structure of your workpiece. Shanghai Changzeng Metal Co., Ltd. produces steel known for its high performance, making it ideal for reliable results during quenching.
The quenching medium you select determines how quickly the steel cools. This cooling rate changes the microstructure and influences hardness, ductility, and the risk of defects.
Oil is a popular quenching medium. It cools steel at a moderate rate, which helps reduce the risk of cracking and warping. Oil quenching works well for high-carbon and alloy steels that do not require extremely fast cooling. You get a good balance between hardness and toughness.
Water provides a much faster cooling rate than oil. It is suitable for carbon steels and low-alloy steels that need a severe quench to reach the right hardness. However, water can cause brittleness, warping, or even cracks if you use it with steels that are sensitive to rapid cooling.
Air quenching is the gentlest method. High-alloy steels often use air because they harden easily and do not need a severe quench. Air cooling reduces the risk of distortion and cracking, making it a safe choice for complex shapes.
Tip: Always match your quenching medium to the type of steel and the hardness you want to achieve.
Here is a quick reference table for choosing the right quenching media:
| Steel Type | Quenching Media Severity | Notes |
|---|---|---|
| Carbon Steel | Severe | Needs fast cooling for hardness. |
| Low-Alloy Steel | Severe | Similar to carbon steel, requires rapid quenching. |
| High-Alloy Steel | Less Severe | Can use slower cooling media like oil or air. |
How you quench steel matters as much as what you use. The right technique helps you avoid defects and ensures consistent results.
Agitation means moving the steel or stirring the quenching medium during cooling. This action breaks up vapor blankets that can form around the hot metal. When you agitate, you get more even cooling and better mechanical properties. Agitation also reduces thermal gradients and helps prevent soft spots or uneven hardness.
Reduces surface-to-surface temperature differences.
Provides uniform heat transfer.
Minimizes vapor trapping, especially in complex shapes.
Note: Proper agitation leads to more consistent results and fewer defects.
Timing is crucial during quenching. You must move the steel from the heat source to the quenching medium quickly. Delays can cause uneven cooling and reduce hardness. For some steels, step quenching or interrupted quenching helps minimize thermal shock and internal stress. These methods involve cooling the steel in stages or pausing during the process to control temperature changes.
| Technique | Description |
|---|---|
| Step Quenching | Gradually reduces temperature in stages to minimize stress. |
| Interrupted Quenching | Pauses during quenching to reduce temperature differences. |
| Controlled Cooling | Ensures uniform temperature distribution, reducing cracking risk. |
| Post-Quench Tempering | Reheats steel after quenching to relieve stress and stabilize structure. |
| Quenching Media Selection | Chooses the right medium to balance cooling rate and minimize distortion. |
After quenching, you need to inspect your steel for cracks or other defects. This step ensures your workpiece is strong and reliable.
Cracks can form if you quench too quickly or use the wrong medium. Always check the surface for visible cracks and listen for unusual sounds when you tap the steel. To reduce the risk of cracks:
Use rounded corners and smooth surfaces to lower stress concentration.
Select the ideal cooling rate and medium for your steel type.
Temper the steel promptly after quenching to relieve internal stress.
Consider multiple tempering cycles to improve mechanical properties.
Alert: If you find cracks, do not use the steel for critical applications. Review your process and adjust your technique or media choice for better results next time.
Quenching is a science and an art. By choosing the right media, using proper techniques, and inspecting your results, you can achieve the hardness and durability you need for any project.
Tempering is the final step in heat treating. You use this process to make your steel less brittle and more useful for real-world tasks. After quenching, steel becomes very hard but also fragile. If you use it in this state, it can break or crack under stress. Tempering fixes this by making the steel tougher and less likely to snap.
Tempering changes the structure inside the steel. When you heat steel after quenching, you lower its hardness and increase its ability to bend without breaking. This is important for tools, knives, and machine parts. You want these items to handle impact and pressure without failing. Tempering lets you control how tough or flexible your finished piece will be.
You need toughness in steel for many jobs. Tempering gives you this by reducing brittleness. When you temper, you allow the steel to absorb shock and flex instead of shattering. This makes your projects safer and longer-lasting. For example, a tempered knife blade will bend slightly under force instead of snapping.
Tip: Always temper after quenching. Skipping this step leaves your steel too hard and too brittle for most uses.
The temperature you choose for tempering affects the final properties of your steel. Lower temperatures keep more hardness, while higher temperatures increase toughness but reduce hardness. You can use either an oven or a torch to reach the right temperature.
A home oven works well for tempering. You get steady, even heat, which is important for good results. Set your oven to the right temperature for your steel type and thickness. Here is a quick guide:
| Steel Type | Temperature Range (°F) | Holding Time |
|---|---|---|
| D2 | 300-350 (high hardness) or 500-550 (balance) | 2 hours + 1 hour per inch over 2 inches |
| 1095 | 300-650 (lower for hardness, higher for toughness) | 2 hours, repeat process once |
| O1 | 400-450 (most uses) or 300-375 (cutting tools) | 2 hours + 1 hour per inch over 2 inches |
Note: Always preheat your oven before placing the steel inside. Use a thermometer to check the actual temperature, as home ovens can vary.
You can also use a torch for tempering small pieces. Move the flame slowly and watch the color change on the steel. Straw yellow means about 400°F, while blue means about 600°F. This method takes practice, but it works when you do not have an oven.
How long you temper matters, too. Longer times at lower temperatures can give similar results to shorter times at higher temperatures, but temperature has a bigger effect.
The relationship between time, temperature, and hardness is important. Here is a simple table:
| Factor | Effect on Hardness |
|---|---|
| Temperature | Higher temperatures lead to faster diffusion and reduced hardness. |
| Time | Longer times at lower temperatures can achieve similar hardness but are less effective than higher temperatures. |
| Hollomon-Jaffe | The relationship H = T(C + log t) shows time has a logarithmic effect compared to temperature. |
Tip: For most projects, temper for at least two hours. If your piece is thick, add more time.
Tempering is your key to strong, reliable steel. By choosing the right temperature and time, you create tools and parts that last.
Steel heat treatment can present several challenges. You may notice issues like warping, cracking, or inconsistent hardness. Understanding these problems helps you improve your results and avoid costly mistakes.
Warping happens when steel bends or twists during heating or cooling. Uneven heating, rapid temperature changes, or improper support can cause distortion. You might see parts that do not fit together or lose their shape.
Uneven heating leads to distortion.
Rapid cooling can twist or bend steel.
Poor support during heat treatment increases warping risk.
Cracking is a serious problem. Steel can crack if you cool it too quickly or if there are high thermal stresses. Cracks often appear after quenching, especially in thick or complex shapes.
Severe thermal stress during quenching causes cracks.
Inconsistent cooling rates increase cracking risk.
Hardness issues and soft spots may develop alongside cracks.
Note: Other common problems include low hardness, soft spots, oxidation, and decarburisation. These defects can weaken steel and reduce its performance.
You can take steps to fix or prevent warping and cracking. Try these adjustments:
Heat the steel to around 650°C for uniform expansion.
Use controlled cooling in stages to minimize distortion.
Support your workpiece properly during heating and cooling.
Consider stress relieving before final machining or heat treating.
Hold the steel at a specific temperature, then cool slowly to relieve residual stress.
Check your alloy composition and hardening temperature for optimal results.
Use hard milling after heat treatment to correct minor warping.
| Problem | Solution |
|---|---|
| Warping | Controlled heating and cooling, proper support |
| Cracking | Stress relieving, slow cooling, alloy checks |
Tip: Always monitor your cooling rate. Fast cooling increases the risk of warping and cracking.
Keeping good records helps you track your heat treatment process and improve future results. Certified facilities record every step, including temperature, time, and cooling methods. You should do the same for your projects.
Write down the temperature and time for each stage.
Record the type of steel and quenching media used.
Note any problems, such as warping or cracking.
Use test pieces to validate your process.
Monitor furnace temperature with surveys to ensure uniform heating.
Track gas pressure, vacuum levels, and cooling efficiency.
Note: Careful record-keeping lets you spot patterns and adjust your technique. If you run into trouble, seek advice from experts or experienced professionals.
By understanding common problems, making smart adjustments, and keeping detailed records, you can master steel heat treatment and achieve reliable results every time.
You now know the key steps for heat treating steel: clean, heat, soak, quench, and temper. Always wear safety gear and check your tools before you start. If you see warping or cracks, review your process and make small changes.
Practice often and keep notes on your results. You will build skill and confidence with each project. Mastering steel heat treatment gives you the power to create strong, reliable parts.
You can heat treat most carbon and alloy steels at home. Avoid stainless and tool steels unless you have advanced equipment. Always check the steel’s specifications before starting.
Watch for color changes. Bright orange or cherry red usually means the steel is ready. You can also use a thermometer for more accuracy.
Yes, a kitchen oven works for tempering most small steel parts. Set the oven to the correct temperature and use an oven thermometer for accuracy.
Wear heat-resistant gloves, safety goggles, long sleeves, and closed-toe shoes. Natural fibers like cotton or leather protect you best.
Rapid cooling creates internal stress. If you quench too quickly or use the wrong medium, cracks can form. Always match the quenching method to your steel type.
Oil works for most steels. Water cools faster but increases cracking risk. Air is safest for high-alloy steels. Always check your steel’s requirements.
Treating large pieces at home is difficult. Most home setups cannot reach or maintain the needed temperatures. For big projects, use professional equipment or services.