- All
- Product Name
- Product Keyword
- Product Model
- Product Summary
- Product Description
- Multi Field Search
Views: 0 Author: Site Editor Publish Time: 2025-09-08 Origin: Site


When you weld 3/8-inch stainless steel, you need to select the right amperage for a strong, clean result. Most welders use 170-200 amps for MIG, 150-180 amps for TIG, and about 150 amps for Stick. These numbers can change based on your machine, the joint, and your welding position. Thicker materials require higher amps, and experts suggest using about 1 amp for every .001 inch of thickness. You should always start within these ranges and adjust the amperage as needed for your setup.
For MIG welding 3/8-inch stainless steel, use 170-200 amps. Adjust based on weld quality.
TIG welding requires 150-180 amps. Test settings on scrap to ensure proper penetration.
Stick welding typically starts at 150 amps. Choose the right electrode size for better control.
Always consider joint type and welding position when setting amperage. These factors affect heat application.
Use shielding gas with at least 98% argon for cleaner welds and to prevent contamination.
Test welds on scrap material help fine-tune your settings before starting the main project.
Adjust your amperage based on the appearance of the weld. Higher amps provide deeper penetration.
Regularly maintain your equipment to ensure optimal performance and prevent welding issues.
When you weld 3/8-inch stainless steel, you need to choose the right amperage and settings for your process. The correct amps and settings help you get strong welds and avoid problems like burn-through or lack of fusion. Below, you will find a quick reference for MIG, TIG, and Stick welding settings for this thickness.
MIG welding is a popular choice for stainless steel because it offers speed and good control. For 3/8-inch thickness, you should set your mig welder settings between 170 and 200 amps. Some technical guides suggest you may need up to 250-275 amps for certain applications, especially if you want deeper penetration or faster travel speed. Always check your machine’s capabilities and adjust your mig welding settings as needed.
| Thickness | Amperage Range | Voltage | Wire Feed Speed |
|---|---|---|---|
| 3/8 Inch | 170-200 amps | 25 volts | 140-170 ipm |
Tip: Start at the lower end of the amperage range and increase if you see poor fusion or a weak weld. Adjust your wire feed speed and voltage to match your amps for the best results.
You should also consider factors like wire size, shielding gas, and the duty cycle of your welder. These affect your mig welder settings and the quality of your weld.
TIG welding gives you precise control over your welds, which is important for stainless steel. For 3/8-inch material, set your amperage between 150 and 180 amps. The right tungsten size also matters. For this thickness, a 3.2 mm tungsten works well and can handle 150-300 amps, giving you flexibility in your settings.
| Tungsten Diameter (mm) | Material Thickness (mm) | Amperage (Amps) |
|---|---|---|
| 3.2 | 3.2 to 6.4 | 150 - 300 |
Note: Use a clean, sharp tungsten and set your machine to the recommended amps for the best results. Adjust your settings if you see the weld pool is too small or too large.
TIG welding settings depend on your joint type and position. Always test your settings on scrap stainless before welding your final piece.
Stick welding is less common for stainless but still useful for some jobs. For 3/8-inch stainless, set your amperage around 150 amps. Choose the right electrode size and type for stainless steel. Most welders use a 3/32" or 1/8" electrode for this thickness.
| Thickness | Amperage Range |
|---|---|
| 3/8 Inch | 150 amps |
Tip: Keep your arc length short and steady. Adjust your settings if you notice too much spatter or poor penetration.
Stick welding settings can change based on your electrode and machine. Always check your machine’s manual for the best starting point.
When you set up your welding machine for 3/8-inch stainless steel, you need to think about more than just the metal’s thickness. The joint type, welding position, and machine type all play a big role in choosing the right amperage and settings. Each factor can change how much current you need and how you approach your weld.
The joint type affects how much heat you need to apply. If you work with a butt joint, you often need less amperage because the edges line up closely. For a T-joint or a corner joint, you may need to increase your settings. These joints have more mass and can pull heat away from the weld area. If you use a groove or bevel, you might need to boost your amps to get full penetration. Always check your joint design before you set your machine. Adjust your settings to match the joint so you get a strong, clean weld.
The position you choose for welding also changes your amperage settings. You will notice that welding flat is easier and lets you use higher amps. When you weld vertical or overhead, you need to lower your settings for better control. Here are some key points to remember:
The welding position influences your choice of electrode size and amperage settings.
Smaller diameter rods work better for vertical and overhead positions. They give you more control and help prevent the weld pool from sagging.
Larger rods fit best in flat or horizontal positions. You can use higher amps and move faster, which helps manage the weld pool.
If you try to use the same settings for every position, you may see problems like too much spatter or poor bead shape. Adjust your settings for each position to get the best results.
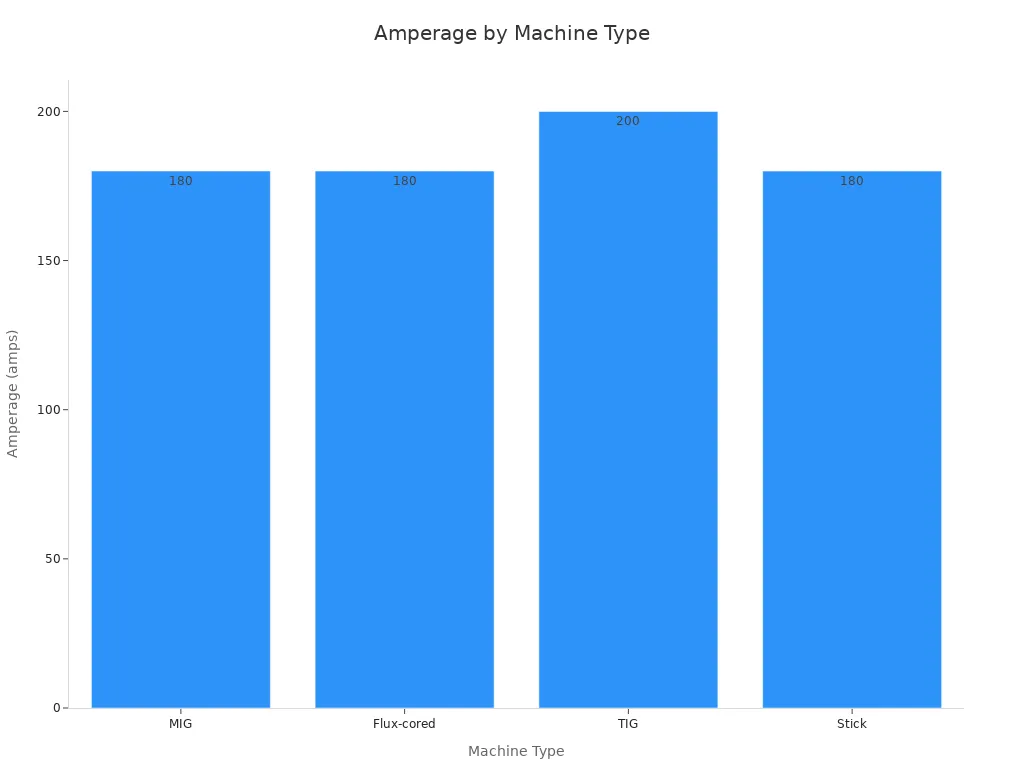
The type of machine you use sets the limits for your amperage and settings. Not all machines can handle the same current or duty cycle. Here is a quick look at common machine types and their typical settings for 3/8-inch stainless steel:
| Machine Type | Duty Cycle | Amperage Range for 3/8-inch Stainless Steel |
|---|---|---|
| MIG | 30% - 50% | 180 amps |
| Flux-cored | 40% | 180 amps |
| TIG | Varies | 200 amps |
| Stick | < 25% | 180 amps |
You should also match your machine’s output to the thickness you want to weld. For example:
A 140-amp machine can weld up to 1/4 inch.
A 180-amp machine works well for 5/16 inch to 3/8 inch.
A 200-amp machine can handle 3/8 inch to 7/16 inch.
A 250-amp machine is best for 1/2 inch.
Tip: Always check your machine’s manual for recommended settings. If you push your machine past its rated current or duty cycle, you risk overheating and poor weld quality.
Choosing the right settings for your joint, position, and machine helps you get strong, reliable welds on stainless steel. Take time to adjust your amps and settings for each job. This approach gives you better control and cleaner results.
When you set up your MIG welder for 3/8-inch stainless steel, you need to pay close attention to amperage. For this thickness, you should aim for about 250 amps. This level of current helps you achieve deep penetration and a strong weld. You also want to set your voltage around 26V for the best results. These settings work well with a larger MIG machine, which can handle the higher duty cycle needed for thicker materials. If your machine cannot reach these amps, you may struggle to get a solid weld. Always check your machine’s manual before you start. The right amperage and voltage settings help you avoid problems like lack of fusion or burn-through.
Tip: Start with the recommended settings, then make small adjustments as you test your welds. Watch the weld pool and bead shape to see if you need more or less amps.
Choosing the correct wire size is just as important as setting the right amperage. For 3/8-inch stainless, a 0.045-inch solid wire works best. This size matches the higher current needed for thicker material. If you use a wire that is too small, you will not get enough current, and your weld may not penetrate deeply enough. On the other hand, using a wire that is too large does not improve conductivity and can increase your costs. The right wire size also helps prevent overheating and keeps your welds safe.
Proper wire size ensures you reach the correct amperage for the job.
Too small a wire leads to weak welds and poor penetration.
Oversized wire increases costs without improving weld quality.
The right size minimizes resistance heating and reduces hazards.
Always match your wire size to your amperage and the thickness of the stainless steel you are welding.
Using the right techniques will help you get the most out of your mig welding settings. Start by selecting a shielding gas with less than 5% carbon dioxide. Many welders prefer a tri-mix gas of argon, helium, and carbon dioxide for stainless. Clean your material with dedicated tools to avoid contamination. Use a push technique and keep a steady travel speed. This approach improves the appearance of your weld bead and controls heat input. Adjust the inductance on your machine to help the weld puddle flow better. Pulsed MIG can also help by reducing spatter and giving you more control. Always use drive rolls and liners made for stainless to prevent contamination. After welding, keep post-flow gas coverage to protect your weld as it cools.
Note: Good preparation and technique make a big difference in weld quality. Take time to set up your equipment and practice on scrap before you start your main project.
When you set up your TIG welding machine for 3/8-inch stainless steel, you need to pay close attention to your settings. The right tig welding amperage ensures you get a strong weld without overheating the metal. For this thickness, you should use between 150 and 180 amps. Many welders follow a simple rule: use one amp for every .001 inch of thickness. For 3/8-inch stainless, this guideline puts you right in the recommended range.
You also need to set your gas flow correctly. For TIG welding, a flow rate of 10 to 15 liters per minute works well. This amount gives you enough shielding to protect the weld pool from contamination. If you use a gas lens with a #10 or #12 cup, you can set your argon flow to about 2-3 cubic feet per hour per cup size. These settings help you keep the weld clean and strong.
| Thickness (inches) | TIG Welding Amperage (amps) | Gas Flow (L/min) |
|---|---|---|
| 3/8 | 150 - 180 | 10 - 15 |
Tip: Always test your settings on scrap stainless before you start your main project. This step helps you fine-tune your tig welding amperage and gas flow for the best results.
Choosing the right tungsten size is important for tig welding 3/8-inch stainless steel. You want a tungsten that can handle the higher amps needed for this thickness. A 3.2 mm (1/8 inch) tungsten works best. This size supports the 150-180 amp range and gives you a stable arc. Make sure your tungsten is clean and sharp before you start. A well-prepared tungsten helps you control the weld pool and keeps your arc steady.
Use 3.2 mm tungsten for 3/8-inch thickness.
Sharpen the tungsten to a fine point for better arc control.
Clean the tungsten before each weld to avoid contamination.
To get the best results with tig welding, you need to follow a few key tips. First, always clean your stainless steel with acetone before welding. This step removes oils and dirt that can cause weld defects. Next, maintain a steady travel speed. Stainless steel does not conduct heat as well as carbon steel, so you need to move at a pace that prevents heat buildup. Start your weld and begin moving within two seconds to avoid overheating the area.
Professional welders recommend using a gas lens and a large cup for better shielding. This setup helps you keep the weld pool protected from air. Adjust your tig welding amperage if you see the weld pool is too small or too large. Too little amps can make the weld weak, while too much can cause defects. Always set your gas flow to prevent turbulence, which can introduce contamination.
Note: Good tig welding technique and the right settings make a big difference in weld quality. Practice on scrap pieces to dial in your tig welding amperage and travel speed.
When you set up your stick welding machine for 3/8-inch stainless steel, you need to pay close attention to your amperage settings. For this thickness, most welders use about 150 amps as a starting point. The exact amperage depends on your electrode size and the type of joint you plan to weld. If you use a 1/8-inch rod, set your machine between 90 and 120 amps. For a 3/32-inch rod, you should use 75 to 90 amps. Always check your machine’s manual for recommended settings. Start at the lower end of the range and increase the amps if you see poor fusion or a narrow bead. Proper amperage settings help you get strong, clean welds without burning through the metal.
Choosing the right electrode size is important for stick welding 3/8-inch stainless steel. Most welders select either a 3/32-inch or 1/8-inch electrode for this thickness. The most common types are E308L-16 or E316L-16 rods. These rods match the base metal and provide good corrosion resistance. Store your electrodes in a dry container to prevent moisture absorption. Moisture can cause porosity and weaken your weld. Use the electrode size that matches your amperage settings and the joint you need to weld. A larger rod works well for flat positions, while a smaller rod gives you better control in vertical or overhead positions.
| Electrode Size | Recommended Amperage | Position |
|---|---|---|
| 3/32 inch | 75–90 amps | All positions |
| 1/8 inch | 90–120 amps | Flat/Horizontal |
Tip: Always match your electrode size to your machine’s output and the thickness of the stainless steel.
You can improve your stick welding results by following a few key techniques:
Select the right electrode for your base metal. Use E308L-16 or E316L-16 rods for most stainless steel jobs.
Set your machine to DC+ polarity. This setting gives you deeper penetration and a stable arc.
Strike the arc confidently and keep a short arc length. A short arc helps you control the weld pool and reduces spatter.
Use a slight weave motion if you need a wider bead. Avoid excessive weaving, which can cause defects.
Let the slag cool before chipping it off. Remove all slag between passes to prevent inclusions in multi-pass welds.
Control your environment. Stick welding can handle wind, but you should avoid excess moisture. Water can cause porosity in your weld.
Note: Good preparation and careful technique help you get the best results from your stick welding settings. Always test your settings on scrap before starting your main project.
Getting your setup right is the first step to a successful weld. You need to focus on several important factors before you start. The choice of gas matters a lot. For stainless steel, use shielding gas with at least 98% argon. This helps protect your weld from contamination and keeps the arc stable. Stick-out length also plays a role. A 3/8-inch stick-out works well, but you may need to adjust it based on your specific conditions. High-amperage guns, such as 400-amp models, are best for heavy materials. For lighter jobs, you can use guns rated for 200-300 amps. The table below summarizes these setup considerations:
| Consideration | Details |
|---|---|
| Choice of Gas | Stainless steel requires at least 98% argon for effective welding. |
| Proper Stick-Out | A 3/8-inch stick-out is recommended, but adjustments may be needed based on specific conditions. |
| Amperage Selection | High-amperage guns (400-amp) are needed for heavy materials, while lighter jobs may use 200-300 amps. |
Tip: Always check your equipment and make sure your settings match the thickness of your material.
Test welds help you fine-tune your settings before you work on your main project. You should always run a test on scrap material that matches your actual job. This lets you see if your amperage, voltage, and wire feed speed are correct. For 3/8-inch thickness, a good starting point is 250-275 amps, 25 volts, and 140-170 inches per minute (ipm) for wire feed. The table below shows these recommended settings:
| Material Thickness | Amperage Range | Voltage | IPM |
|---|---|---|---|
| 3/8 Inch | 250-275 amps | 25 volts | 140-170 ipm |
Watch your test welds closely. If you see poor penetration or too much spatter, you may need to adjust your settings. Clean your base materials and check your shielding gas flow. Use a shorter stick-out if needed. Regular maintenance of your equipment also helps prevent problems.
You need to adjust your amperage to get the best results on 3/8-inch stainless steel. Higher amperage gives you deeper penetration, which is important for thicker materials. For single-pass welding, you can reach up to 5/16 inch with careful control of heat input and a steady arc. For thicker sections, use multi-pass welding to avoid warping and keep your weld strong. Always choose the right shielding gas, such as argon blends, for cleaner welds. Prepare your joints by beveling and cleaning them before you start.
Common mistakes include overlooking material thickness, ignoring the welding position, and failing to check specifications. You should always match your electrode size to the thickness and select the right settings for your machine. If you notice poor penetration or excessive spatter, try lowering your settings, cleaning your materials, or increasing your voltage. Keep your equipment in good condition by inspecting and replacing worn parts.
Note: Adjust your settings as you go. Small changes can make a big difference in weld quality and appearance.
When you weld 3/8-inch stainless steel, use these amp ranges as your starting point: MIG (170–200 amps), TIG (150–180 amps), and Stick (about 150 amps).
Begin with the recommended settings and adjust based on weld appearance and penetration.
Test your settings on scrap to fine-tune for your setup.
Proper setup and technique matter for strong, clean welds.
Protect the weld root with an inert gas shield during welding and cooling to ensure corrosion resistance.
You should start with 170–200 amps for MIG, 150–180 amps for TIG, and about 150 amps for Stick. Test on scrap metal first and adjust as needed.
A 140-amp welder may not provide enough power for full penetration on 3/8-inch stainless steel. You will get better results with a machine rated for at least 180 amps.
Use a tri-mix gas (argon, helium, and carbon dioxide) or 98% argon with 2% CO₂. This mix helps prevent oxidation and keeps your welds clean.
Clamp your workpieces securely. Use short welds and allow cooling between passes. Multi-pass welding helps control heat and reduces warping.
A 3.2 mm (1/8 inch) tungsten works best. It handles the higher amperage needed for this thickness and gives you a stable arc.
Dull or gray welds often mean poor shielding gas coverage or overheating. Check your gas flow and travel speed. Clean your base metal before welding.
Yes, you should back purge with argon when welding stainless steel. This protects the weld root from oxidation and ensures corrosion resistance.